citroën logo
Engine overhauling
citroën logo

assembling engine-gearboxcylinderheadscylinders/ valvescrank- and camshafhousingcowlingscleaningmanifoldmalfunctionspistons and piston-ringstips


C leaning
Although the engine was in my opinion running very well, I have decided to make a new start which means overhauling the complete engine.
First I have made all kinds of pictures to remember the position of all different parts/ components. Also during dismantling the engine I have made pictures.
Later on you will see how valuable these pictures are.

During dismantling the parts/ components they were cleaned, labled and stored. At the same time an inverory-list was made for components which has to be bought again or has to be repaired.
At the moment of rebuiling/ assembling the engine I will have all the parts/ components in stock as new.


housings - 22Kb
housings - 24Kb


Housing

After smearing the two housings mating faces with a suitable sealant on the outer edges, they were fit together after checking that no sealant has entered between the housings and bearings. Both engineparts where cleaned and at assembling-stage build together with a fluid-sealing (the sealant was delivered by Stolk Engineoverhauling in Rotterdam)


Crankshaft and camshaft
The crankshaft and camshaft are cleaned with a pice of cotton steeped in oil, after cleaning a slight film of oil is lubricated on both shafts before assembling. Never clean those engineparts with spirit/ white spirit, it can be damaged those parts irreparable.


distributor and generator at the crankshaft - 22Kb
look into the engine - 19Kb


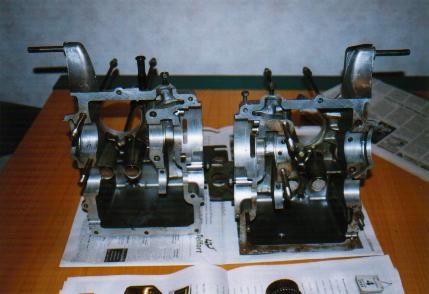
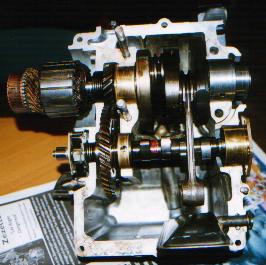
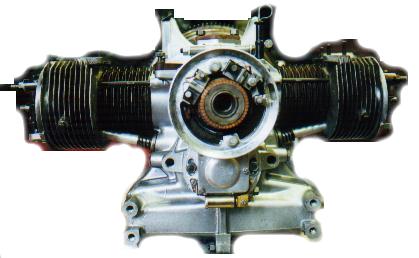
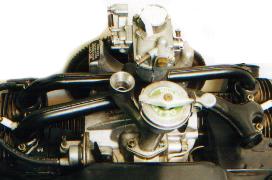
Alle inner parts of the engine are professionaly controlled by Stolk Engine-overhauling in Rotterdam. All parts were in a very good shape.


crankshaft - 11Kb
camshaft - 13Kb


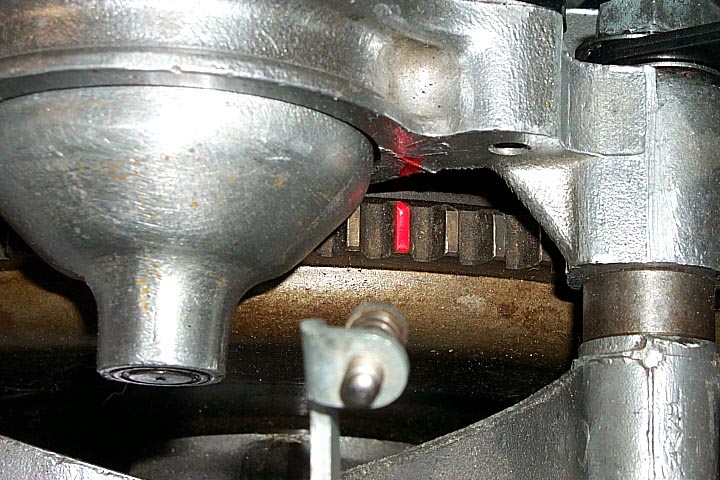
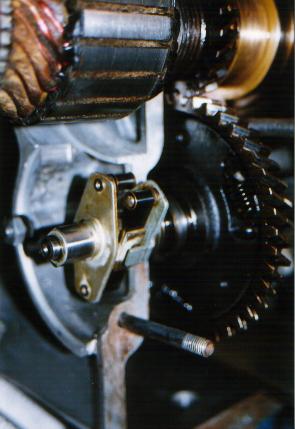
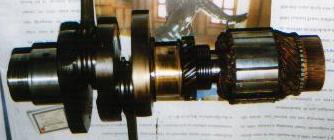
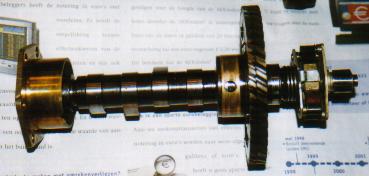
While installing the shafts don't forget to change the topbearing in the crankshaft by a new one!
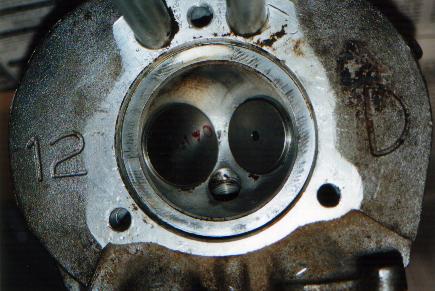
Now you have more space to handle this, later on it will cost you much more time and fustration.

The generator I have dismantled with a self made tool, see Special Tools for more information.


Cylinderheads
After the cylinder heads have been dismantled they were throroughly cleaned and inspected by Stolk in Rotterdam. They were in a very good shape but nevertheless the valve seats were replaced by stronger ones for a more better prevention with running on unlead fuel.
In 1958 unlead fuel was the only fuel the have had for this cars, but the valve seats were not as good than the can make nowadays (stellite-material).


old cylinderhead - 21Kb
overhauled cylinderhead - 30Kb


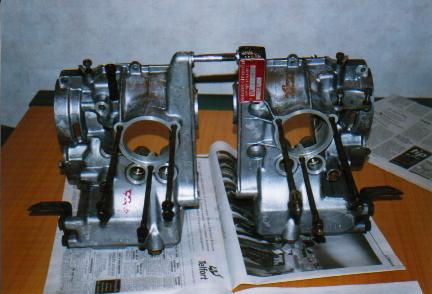
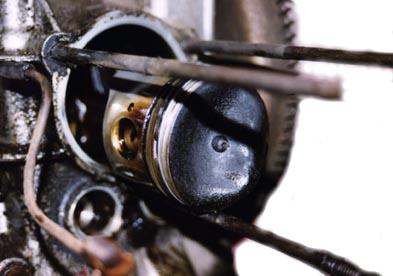
cylinders and valves
The cylinders were slightly rebores, bushes were replaced by new once.
Valves, valvebushes and valveseals are all replaced by new once.
The used valves were cleaned and stored, you'll never know.


Pistons and piston-rings
The piston-rings are made by Perfect Circle (manufactured by Floquet Monopole under license from Perfect Circle Division, Dana Corporation, U.S.A.)which are the best in his kind.
An extra set of piston-rings I have ordered to keep in stock for the future, nowadays they are easy to get - nobody knows if this will be the same over a copple of years.

To remove the piston-rings use a twisting action and carefully slide them upwards over the piston lands. Take care not to cut your fingers, the rings may be sharp. In my case I used strong gardengloves.
To assist removal insert tow or three old feeler blades between ther pistonring and the piston to prevent the rings entering the grooves as they are removed. Never remove or fit piston-rings over the bottom of the piston.
Clean the grooves with an old broken piston-ring, taking care not tot scratch the aluminium surfaces of the pistons, also here use protected strong gloves.
More detailed information you will find in the Workshop Manual from Citroën and the Owners Workshop Manual by Haynes Publishing Group.


piston with the old piston-rings - 24Kb


partialy overhauled engine - 19Kb

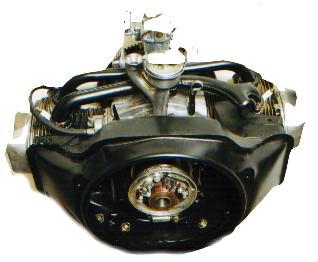
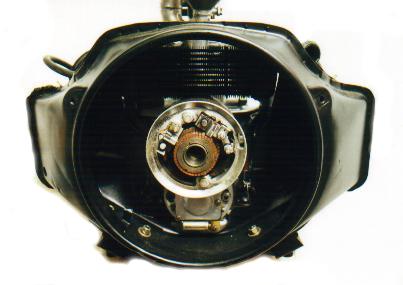
Cowlings
The cowlings (without any rust!) were slightly treated with sandpaper and sprayed with a few layers of black Rust-Oleum (Owatrol was mixed through the paint).


Manifold (inlet- and outlet)
The manifold was cleaned with a steelbrush and white spirit, thereafter sprayed with w layers of heatresistant black paint. I used RUST-OLEUM® Hard Hat Aerosol Bar-B-Q-blackt 7778
This paint is temperatureresistant against 538°C which is anough in our case.


overhaulde engine, view from above - 15Kb overhauled engine, view from the front - 20Kb overhauled engine, view from above - 12Kb

Assembling the engine to the gearboxhousing
*
When refitting the engine and gearbox I have met the problem which the right type of retaining "bolts".
The Workshop Manual shows that there are different types which were used, depending on type and year of the 2CV.
For this 2CV I used the below mentioned "bolts" (without hexagon-head)
- left-below (seen from drivers seat) M10 x 60 (the first exhaust part is fasten by this)
- left-upper side M10 x 65 (better is 70 to get more space for the horn)
- right-below M10 x 65
- right-upper side M10 x 70 (on this also the cableholder is fastened)

All those "bolts" were forseened at the end with a screw-thread of 15 mm (this part is turned into the houding), the other side has a thread of 20 mm.
Locktyde is use to prevent unscrewing of the "bolts" due to the vibration of the running engine.

Don't forget on drum brak models the handbrake cables must be refitted tot the crossmember ducts!


TIPS
*

TIP 1
Cleaning piston-ring grooves
Clean the grooves with an old broken piston-ring, taking care not tot scratch the aluminium surfaces of the pistons, also here use protected strong gloves.
At the same time you can use carburatorcleaner as mentioned before.
More detailed information you will find in the Workshop Manual from Citroën and the Owners Workshop Manual by Haynes Publishing Group.

TIP 2
Removing the gudgeon pin to remove teh piston
The piston is located on the connecting rod by a fully floating gudgeon pin and this is retained by circlips, although in earlier engines the gudgeon pin was an interference fit in the piston.
It is possible to press the pin out if the piston is heated slightly and supported, shilst the pin is removed using a long bolt and suitable distance pieces. For safety you should use strong heatresistand gloves. I used a small and long piece of wood, it is softer then the piston for which is impossible to harm the piston.
It is essential to support the piston when removing the geudgeon pin, otherwise it is possible for the onnecting rod to become misaligned.
To heat the piston I use an electric paint remover, but a gasburner should work also well.

Never use lots of power or hammer, this can easily damage the connecting rods and bearings.

TIP 3
Removing brown moisture
The brown moisture which had place on the outer of the housings and carburator were removed with a soft steelbrusk and a carburatorcleaning-spray. (you have to wear protected gloves and work only in open air - its dangerous stuff/ cancerbegetter. This spray contains Xylen and Toluen!

*
In Germany I found an other way to remove the brown moisture.Een andere mogelijkheid is door gebruik te maken van een ovenreinigingsmiddel, veelal wordt dit in een spuitbus verkocht.

TIP 4
Kleppen stellen.
Als de motor nog koud is, motor starten zonder ventilator, en ca 5 min stat. laten draaien.
Nu stellen op 0.20 mm.
Inlaat klep open: uitlaat aan zelfde kant stellen, en omgekeerd.
Als je het deksel eraf haalt komt er ca. 0.25 liter olie uitlopen, dus even van een oud blikje (of plastiekje) een opvangbakje knippen.

Bij een koude (ongeveer 20°C) motor kunnen de kleppen ook worden gesteld, er zal dan wél een andere klepspeling moeten worden aangehouden. Deze speling zal ik empirisch vaststellen en in een later stadium melden.


TIP 5
Hulpstartkabels gebruiken.
Van de te starten auto de min-kabel verwijderen van de accu. De hulpstartkabels respectievelijk op de plus- en minpool van de hulpauto en bij de te starten auto resp. ook de pluskabel op de pluspool van de accu, maar de minkabel op de minkabel of een metalen deel van de motor.
De min-kabel vooral niet op de min-pool van de te starten auto want dan kan de accu van deze auto exploderen!


TIP 6
Gebruik van het winterhoesje (grillehoes) bij de oudjes (ribbelkap).
De door de radiateurhoes gelaten opening is regelbaar:
- beneden de 0°C de grillehoes geheel sluiten.
- beneden de +5°C,grillehoes half sluiten waarbij het schuine vlak aan de linker
kant van degrille open moet blijven.
- boven de +5°C, grillehoes mag geheel verwijderd worden

TIP 7
Benzinepomp stuk en nog een heel eind te gaan?
Vul het ruitenspoeier reservoir met benzine uit de benzineleiding aan de voorzijde en je kunt weer een kilometer of 15 rijden. Het reservoir moet wel hoger hangen dan de carburateur (valstroom principe).


TIP 8
Wel of geen benzine bij de carburateur?
Wrik voorzichtig de benzineleiding los en start even. Wanneer er benzine uit komt is je vraag beantwoord.

Wanneer de carburateur en benzinepomp helemaal droog staan dan laat je via een slangetje eerst de carburateur vollopen en nadat de auto gestart is pompt de benzinepomp de benzine makkelijk op.


TIP 9
De veer van de carburateur gebroken?
"Duik" dan onder je stoel of bank en gebruik één van de stoelrubbers. Vergeet niet alsnog dit rubber weer te vervangen door een veer.


LET OP!
Als het anker van de dynamo er recent afgeweest is, dan even de vent. bout met een tussenstukje monteren zodat het anker er niet af kan vliegen !

* TIP 10
Onderdelen carburateur schoonmaken
De losse onderdelen van de carburateur kunnen gemakkelijk worden gereinigd met ovenreiniger (zie tip 3).
Een ander mogelijkheid is een schoonmaakmiddel met daarin minder dan 5% niet-ionische Tenside (Nederlandse vertaling voor dit woord probeer ik nog te vinden), azijnzuur en citroenzuur.
Zo'n produkt is o.a. te koop koop in Duitse supermarkten of drogisterijen, bij ons in Nederland heb ik dit mengsel nog niet kunnen vinden. Ik heb dit kunnen kopen onder de naam Frosch-Essigreiniger, het is een produkt van Erdal-Rex, D-55120 Mainz, A-5400 Hallein. In Duitsland wordt dit gebruikt voor het reinigen van Keuken, bad en WC en verwijdert tevens kalk en vetresten (dus ook voor velgen te gebruiken)

TIP 11
Bovenste Dode Punt (BDP) visualiseren
Om het bepalen van het BDP te vergemakkelijken heb ik op een vliegwieltand én op het versnellingsbakhuis een rode markering gemaakt. Met dit "hulpmiddel" werkt het sneller om het BDP te bepalen voor het juist afstellen van de ontsteking.
De veel gebruikte afstelpen van 6 mm doorsnede werkt natuurlijk ook goed maar onderweg heeft niet iedereen deze pen bij zich.

De positie van de vereiste voorontsteking kan ook middels een streepje op het versnellingsbakhuis worden aangegeven.


visuele positie van het BDP op vliegwiel en versnellingsbakhuis - 96Kb


malfunctions
*

Motor slaat niet aan
Oorzaak:
Brandstoftank leeg; benzinefilter verstop; lucht in brandstofsysteem; brandstofpomp defect; vlotternaald blijft hangen; motor te koud; te lage compressie-einddruk; smeerolie te dik; ijs in de uitlaat (condens is bevroren).
Remedie:
bij ijs in de uitlaat, uitlaat evt verwarmen met een föhn of er auto in een warme garage zetten.

Motor levert onvoldoende vermogen
Oorzaak:
Lucht in het brandstofsysteem; brandstofpomp lekt; vervuilde klepzittingen; brandstofpomp heeft te kleine opbrengst (zuigt misschien valse lucht aan).
Remedie:


Motor slaat af tijdens rijden
Oorzaak:
Brandstoftank leeg; mechanische schade.
Remedie:


Motor Uitlaat rookt
Oorzaak:
kleppen blijven hangen; kleppen lekke'; klepspeling te groot; moetor overbelast; opbrengst brandstofpomp te groot; versleten compressieveren; verkeerde olieschraapveren.
Remedie:


Motor detoneert
Oorzaak:
Brandstof met te laag octaangetal; vuilresten in de verbrandingsruimte.
Remedie:


Motor klopt
Oorzaak:
kleppen blijven hangen; lagers zijn uitgelopen.
Remedie:


Motor loopt onregelmatig
Oorzaak:
kleppen blijven hangen; lucht in het brandstofsystee'; motor te koud.
Remedie:


Later zal ik ook de verschillende remedies aandragen.


Ref:
Citroën handboeken 442, 446, 536, 580/1 en 621
Zelf sleutelen aan uw 2CV 1969, ANWB/ ZHUM
Repareer zelf uw auto, handleiding voor onderhoud ANWB/ The Readers Digest NV (ISBN: 90-6407-077-6)
Vraagbaak Citroën 2CV en Dyane 1975-1982 van P.H. Olving
Handboek Eendologie door Jan van de Velde en Jim van der Put (het Eendeei)
Onderhoudsboekje van de Berline 2PK, Citroën S.A. Brussel
Laszlo Mogyorossy (EEEC)


line - 4Kb
index - 2Kb
back - 2Kb
top
next - 2Kb
 indexpage 
back
top
next